Disassembling kitchen cabinets is a task that may be undertaken for various reasons, whether it’s to remodel the kitchen, replace old cabinets, or relocate them to a new space. Before diving into the disassembly process, it’s essential to approach the task with careful planning and a systematic approach. Understanding the structure of your kitchen cabinets is the first step in this process.
Begin by emptying the cabinets of all contents. This not only makes the cabinets lighter but also ensures that you won’t have to deal with the added challenge of removing items while disassembling. Take this opportunity to declutter and organize, setting aside items you plan to keep and those you might want to discard or donate.
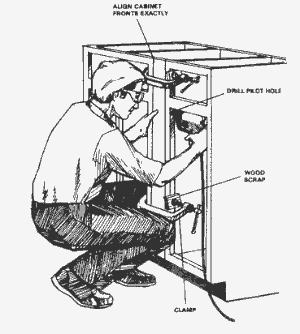
To disassemble upper cabinets, start by removing any screws or nails securing them to the wall. A power drill or screwdriver can be handy for this task. If cabinets are connected to each other, carefully detach them, ensuring you have a clear understanding of how they are interlocked. It’s advisable to have a helper during this process, especially when dealing with larger cabinets, to prevent accidents and ensure a smoother disassembly.
Lower cabinets often rest on a base or kickboard. Remove this first, as it provides access to the cabinet’s main structure. Once the kickboard is removed, you can easily access the screws or nails securing the cabinet to the floor or wall. Keep in mind that some cabinets might also be connected to each other along the base, so proceed with caution to avoid damage.

When dealing with built-in appliances, such as ovens or microwaves, disconnect them before attempting to disassemble the surrounding cabinets. Follow manufacturer instructions for safe appliance removal and turn off relevant power sources to ensure safety during disassembly.
It’s crucial to keep track of the hardware you remove during the disassembly process. Place screws, bolts, and other small parts in labeled bags to make reassembly more straightforward. Consider creating a system, such as grouping hardware by cabinet or using separate bags for upper and lower cabinets, to avoid confusion later on.
If your cabinets have shelves, remove them carefully. Some shelves might be adjustable, requiring you to unhook or unscrew them from their support brackets. If the shelves are fixed, check for any fasteners securing them in place and remove them before proceeding.
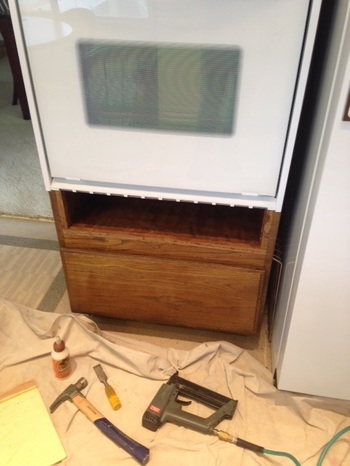
For cabinets with doors, remove the doors first. This not only makes the cabinets lighter but also reduces the risk of damage to the doors during the disassembly process. Take note of any hinges or hardware that may need special attention or tools for removal.
Pay attention to the construction of your cabinets. Some cabinets may have a frameless design, where the doors and drawers are directly attached to the cabinet box. Others may have a face frame, which is a wooden frame attached to the front of the cabinet box. Understanding the construction type is crucial for a successful disassembly.
If you plan to reuse or sell the cabinets, disassemble them with care to minimize damage. Mark any parts that require special attention during reassembly, such as fragile edges or specific alignment requirements. Taking photographs at various stages of disassembly can serve as a helpful visual reference during reassembly.
During the disassembly of cabinets, it’s common to encounter caulking or adhesive securing them to the wall. Carefully cut through any caulking with a utility knife, and gently pry the cabinets away from the wall. Exercise caution to avoid damaging the wall surface, especially if you plan to reuse the cabinets elsewhere.
While disassembling, be mindful of any plumbing or electrical connections hidden behind or within the cabinets. If your kitchen cabinets housed a sink, dishwasher, or other appliances with plumbing connections, ensure that these are safely disconnected before proceeding with the disassembly.

For cabinets with built-in lighting fixtures, disconnect the power source and remove the fixtures before disassembly. This not only ensures safety but also allows you to preserve the lighting components for potential reuse in other areas of your home.
Keep in mind that the disassembly process may vary depending on the type and brand of cabinets you have. Consult the manufacturer’s instructions or seek guidance from a professional if you encounter any challenges or uncertainties during the process.
Once the cabinets are disassembled, consider labeling the parts or grouping them for efficient storage. If you plan to reuse the cabinets, storing them in a safe and dry area will help preserve their condition until you’re ready for reinstallation. If not, arrange for proper disposal or recycling of the cabinet components in an environmentally friendly manner.
Disassembling kitchen cabinets is a meticulous process that requires careful planning and attention to detail. Whether you’re preparing for a kitchen remodel or relocating cabinets to a new space, a systematic approach ensures a smooth disassembly process and facilitates future reassembly or reuse. Take the time to label and organize components, keep track of hardware, and, if needed, seek professional guidance for a successful and efficient cabinet disassembly.
Kitchen Cabinet Modification
Tips: Installing Kitchen Cabinets
Kitchen in Living Room with Bar Counter. Original Interior Ideas

BFD Rona Products DIY INSTALL PRE-FABRICATED KITCHEN CABINETS

Galley Kitchen Layout Design Ideas – Small Design Ideas

Beautiful Handy Hallway Pallet Shoe Rack • Pallet Ideas • 1001 Pallets
Tools To Install Kitchen Cabinets

Installing Kitchen Cabinets – YouTube

Related Posts:
- Kitchen Cabinets With Beadboard Inserts
- Uneven Ceiling Kitchen Cabinets
- Handle Size For Kitchen Cabinets
- Painting Foil Wrapped Kitchen Cabinets
- Annie Sloan Grey Kitchen Cabinets
- How To Make Modular Kitchen Cabinets
- How To Repair Kitchen Cabinet Doors
- Roller Shutter Cabinets For Kitchen
- Toll Brothers Kitchen Cabinets
- Kitchen Cabinet Towel Rail