When it comes to maintaining the aesthetic appeal of your kitchen, one crucial aspect is often overlooked: the grout in your kitchen backsplash. Over time, wear and tear can cause the grout to crack or discolor, detracting from the overall look of your kitchen. In this article, we’ll delve into the essential steps for repairing grout in your kitchen backsplash, ensuring it not only looks great but also stands the test of time.
To begin with, understanding the common causes of grout damage is key. Moisture is a significant culprit, as it can seep into the grout, causing it to weaken and crack. Additionally, regular use of harsh cleaning chemicals may contribute to the deterioration of grout. By identifying these factors, you can take preventive measures to minimize the likelihood of future damage.
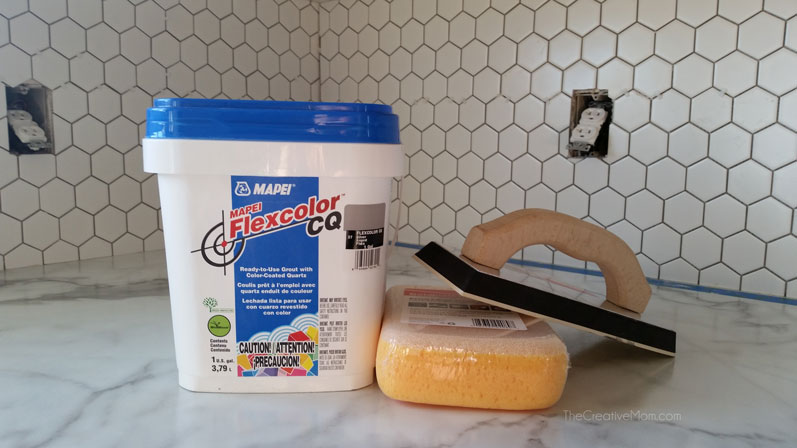
Before jumping into the repair process, gather the necessary tools and materials. You’ll typically need a grout saw, a grout float, and, of course, new grout. These items are readily available at most home improvement stores and are relatively inexpensive. It’s crucial to choose a grout color that matches the existing grout to maintain a seamless look in your backsplash.
Start the repair process by carefully removing the damaged grout using a grout saw. Take your time with this step to avoid damaging the surrounding tiles. Once the old grout is removed, thoroughly clean the area to ensure proper adhesion for the new grout. A mixture of water and mild detergent works well for this purpose.

Now comes the fun part – applying the new grout. Using a grout float, press the grout into the spaces between the tiles, ensuring complete coverage. Wipe away excess grout with a damp sponge, being careful not to remove too much from the spaces between the tiles. Allow the grout to dry completely before assessing the final result.
In some cases, sealing the grout is a wise additional step. Grout sealer helps protect against moisture and stains, prolonging the life of your repair. Be sure to choose a high-quality grout sealer and apply it according to the manufacturer’s instructions.
When it comes to the longevity of your grout repair, proper maintenance is key. Avoid using abrasive cleaners that can wear away at the grout, and promptly address any spills or stains to prevent discoloration. Regularly inspect the grout for signs of wear and tear, addressing any issues promptly to avoid more extensive repairs down the line.
Now, let’s talk about the benefits of tackling grout repair as a DIY project. Not only does it save you money on hiring a professional, but it also empowers you to take control of the maintenance of your kitchen. DIY grout repair is a relatively straightforward process, even for those with limited home improvement experience.

On the flip side, there are instances where calling in a professional might be the best course of action. If the damage to your grout is extensive or if you’re dealing with a larger tiled area, a professional can ensure a more precise and efficient repair. Additionally, if you’re not confident in your DIY skills, hiring a pro eliminates the risk of making mistakes that could worsen the situation.
Let’s address the issue of timing. How often should you be inspecting and repairing the grout in your kitchen backsplash? The frequency depends on various factors, including the quality of the original installation, the type of grout used, and the level of wear and tear your kitchen experiences. As a general rule of thumb, a thorough inspection every six months is a good practice.
Now, let’s touch on the aesthetic aspect. Grout color can significantly impact the overall look of your kitchen backsplash. While matching the existing grout is essential for a cohesive appearance, you might also consider experimenting with contrasting grout colors to add a touch of personality to your kitchen. This small detail can make a significant difference in the visual impact of your backsplash.
While we’re on the topic of aesthetics, let’s discuss the importance of cleanliness in maintaining the beauty of your grout. Regular cleaning, using mild and non-abrasive products, is crucial for preserving the color and integrity of your grout. Avoiding harsh chemicals will ensure that your grout stays looking fresh and vibrant for years to come.

Now, let’s tackle a common concern – mold and mildew in grout lines. The damp environment of a kitchen makes it susceptible to the growth of mold and mildew, especially in the grout lines. To address this issue, consider using a mold-resistant grout or applying a mold inhibitor after completing the grout repair. This extra step can go a long way in preventing the unsightly and potentially harmful growth of mold.
Moving on, let’s discuss the impact of grout on the structural integrity of your kitchen backsplash. While grout may seem like a minor component, it plays a crucial role in supporting and stabilizing the tiles. Cracked or damaged grout compromises the structural integrity of the entire backsplash, making timely repairs essential to prevent further damage.
Now, let’s talk budget. Grout repair is a cost-effective way to refresh the look of your kitchen without the need for a full-scale renovation. The materials required for grout repair are relatively inexpensive, and the process can be completed with basic tools. This makes it an accessible and budget-friendly option for homeowners looking to enhance the appearance of their kitchen.
Repairing grout in your kitchen backsplash is a DIY-friendly task that can significantly improve the aesthetics and longevity of your kitchen. By understanding the causes of grout damage, using the right tools and materials, and incorporating preventive measures, you can ensure a successful grout repair. Whether you choose to tackle the project yourself or enlist the help of a professional, the key is to address grout issues promptly and consistently to keep your kitchen looking its best.

Kitchen Backsplash DIY Grout

How to Make Your Own Brick Backsplash With Drywall Mud eHow

Kitchen renovation REVEAL- how to lay backsplash tile – The Creative Mom
Groutless Backsplash – Kitchen: How To Install Exciting Groutless Backsplash For – This
DIY Kitchen Backsplash (Part 5): Grouting Backsplash Tiles
Our kitchen renovation: Backsplash with grout
Adhesive Tile Mats Make Tile Installation Quick
/GettyImages-984792108-5c796c87c9e77c0001fd59c0.jpg)
GroutColoring Owings

Splashback Tiling – South Coast Handyman

Related Posts:
- Tile Mural Backsplashes For Kitchens
- Mexican Style Kitchen Backsplash
- Brown Subway Tile Kitchen Backsplash
- Groutless Kitchen Backsplash
- Iridescent Kitchen Backsplash
- Tiling Kitchen Backsplash Corners
- Ceramic Glass Tile Kitchen Backsplash
- One Piece Backsplash For Kitchen
- Installing Tin Backsplash Kitchen
- Kitchen Backsplash Herringbone Pattern