Kitchen Island With Seating DIY Way
Building your kitchen island with seating can be a transformative project for your home. A well-designed kitchen island adds valuable counter space and storage and serves as a central hub for family gatherings and entertaining guests. This guide will walk you through the planning, design, construction, and finishing processes, ensuring you create a functional and stylish kitchen island that meets your needs.
Planning Your Kitchen Island
Assessing Your Space
Before diving into construction, it’s crucial to evaluate the available space in your kitchen. Measure the dimensions of your kitchen area to determine the size of the island that will fit comfortably without obstructing traffic flow. Consider the “kitchen triangle” concept, which involves the strategic placement of the sink, stove, and refrigerator to optimize efficiency. Ensuring your island doesn’t disrupt this triangle is essential for maintaining a functional kitchen layout.
Defining Your Needs
Identify the primary functions you want your kitchen island to serve. Common uses include additional prep space, extra storage, seating for casual dining, and housing appliances like a dishwasher or microwave. Make a list of these needs to guide your design decisions. For instance, if you frequently entertain guests, incorporating seating for multiple people might be a priority, whereas a baking enthusiast might prioritize ample counter space and storage for baking tools.

Budgeting and Materials
Establishing a budget is a critical step in planning your kitchen island. Consider the cost of materials, tools, and any professional assistance. Common materials for kitchen islands include wood, metal, and stone. Each material has its own price range and maintenance requirements. Researching the pros and cons of each option will help you make an informed decision that aligns with your budget and design preferences.
Designing Your Island
Sketch out a rough design of your island, incorporating the features and dimensions you’ve determined. Online design tools and software can also help visualize your concept in a 3D model. Pay attention to details like the height of the island, which typically ranges from 36 to 42 inches, depending on whether you plan to use it for dining or food prep. Ensure the design includes adequate space for seating, typically allowing 24 inches of width per stool or chair.
Gathering Permits and Approvals
Adding a kitchen island may require building permits in some areas, especially if it involves plumbing or electrical work. Check with your local building authority to understand the necessary permits and approvals. Complying with these regulations is crucial to avoid legal issues and ensure your project meets safety standards.
Preparing for Construction
Once you’ve finalized your design and secured the necessary permits, gather all required materials and tools. Common tools for this project include a saw, drill, level, measuring tape, and clamps. Having everything prepared before starting construction will streamline the process and help you stay organized.

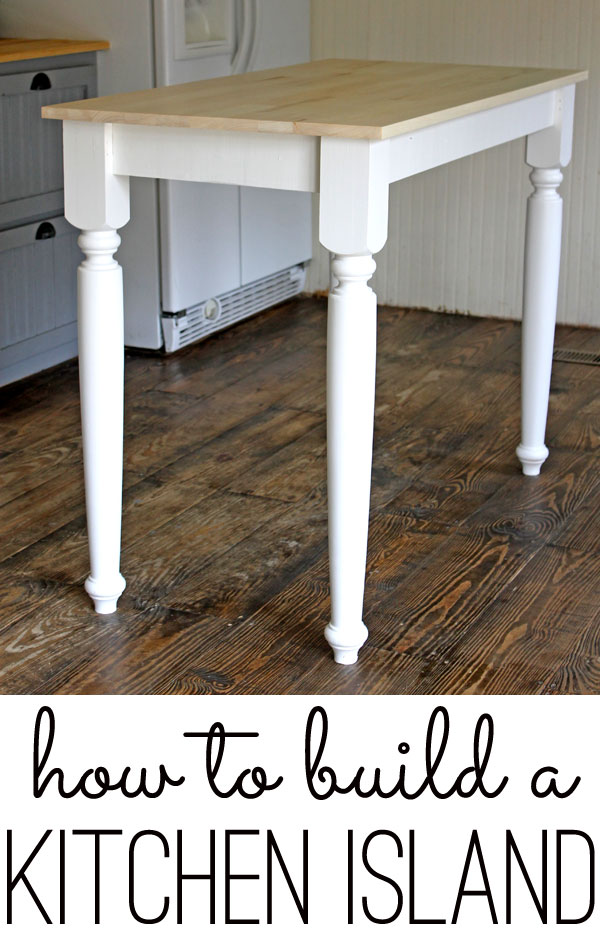
Building the Frame
Constructing the Base
The base is the foundation of your kitchen island, providing stability and support. Begin by cutting the frame pieces to size based on your design plans. Use high-quality lumber, such as 2x4s, to ensure durability. Assemble the base frame using wood screws and a drill, ensuring all corners are square with a carpenter’s square. Reinforce the joints with metal brackets for added stability.
Adding Support Beams
For larger islands or those with heavy countertops, additional support beams are necessary. Install horizontal support beams across the width of the base frame, securing them with wood screws. These beams distribute weight evenly and prevent the island from sagging. Consider adding diagonal braces for extra reinforcement if your island is particularly large.
Creating the Countertop Frame
Construct a frame for the countertop that will sit atop the base. Use sturdy lumber and ensure the frame dimensions match your countertop material. If you’re using a heavy countertop material like granite or marble, reinforce the frame with additional supports. Secure the countertop frame to the base using wood screws, making sure it is level and flush with the edges of the base.

Installing Cabinets and Drawers
If your design includes cabinets or drawers, now is the time to install them. Pre-made cabinets can be purchased and fitted into the base frame, or you can build custom cabinets to match your specifications. Secure the cabinets to the base frame using wood screws and ensure they are level. Install drawer slides and fit the drawers into place, making any necessary adjustments for a smooth operation.
Building the Seating Area
For an island with seating, extend the countertop overhang on one or more sides to create a comfortable dining area. The overhang should be at least 12 inches to provide adequate legroom. Install support brackets underneath the overhang to prevent sagging and ensure stability. These brackets can be decorative, adding to the aesthetic appeal of your island.
Finishing the Frame
Sand the entire frame to smooth out rough edges and prepare it for finishing. Apply wood filler to any gaps or imperfections, then sand again for a seamless look. Wipe down the frame with a damp cloth to remove dust and debris before moving on to the finishing steps.
Installing the Countertop
Selecting Your Countertop Material
Choosing the right countertop material is crucial for both functionality and aesthetics. Popular options include granite, quartz, butcher block, and laminate. Each material has its own advantages and maintenance requirements. For example, granite is durable and heat-resistant but requires periodic sealing, while butcher block offers a warm, rustic look but needs regular oiling to prevent drying and cracking.
Measuring and Cutting
Accurate measurements are essential for a perfect fit. Measure the dimensions of the countertop frame and transfer these measurements to your countertop material. If you’re using a heavy material like granite, consider hiring a professional to cut and install it. For DIY-friendly materials like butcher block or laminate, use a circular saw with a fine-tooth blade to make precise cuts.
Securing the Countertop
Place the countertop onto the frame, ensuring it fits snugly and is level. Secure it to the frame using construction adhesive or screws, depending on the material. If using screws, pre-drill holes to prevent splitting. Apply a bead of silicone caulk along the seams where the countertop meets the frame to create a watertight seal and prevent moisture damage.
Adding a Backsplash
A backsplash can enhance the look of your kitchen island and protect the wall from spills and splashes. Choose a material that complements your countertop, such as tile, stainless steel, or stone. Measure the area and cut the backsplash material to size. Apply adhesive to the back of each piece and press it into place, starting from the center and working outward. Use spacers to ensure even gaps between tiles and finish with grout to seal the joints.
Finishing Touches
Once the countertop is securely in place, sand any rough edges and apply the appropriate finish. For wood countertops, apply multiple coats of food-safe oil or sealant to protect the surface. Stone countertops may require sealing to prevent staining. Follow the manufacturer’s instructions for the best results. Clean the countertop thoroughly to remove any dust or residue before using it.
Inspecting for Flaws
Carefully inspect the countertop installation for any flaws or imperfections. Check for gaps, uneven areas, or loose sections. Address any issues promptly to ensure a professional finish. A well-installed countertop not only enhances the look of your kitchen island but also ensures its functionality and longevity.

Adding Storage and Utilities
Installing Shelving
Incorporate shelving into your kitchen island design for added storage. Open shelves are great for displaying dishes, cookbooks, or decorative items. Measure and cut shelves to fit within the frame, then secure them with brackets or screws. For a clean look, use hidden brackets or build recessed shelves into the frame.
Adding Cabinets
Cabinets provide concealed storage for kitchen essentials, keeping your island organized and clutter-free. Install pre-made cabinets or build custom ones to fit your design. Secure the cabinets to the island frame with screws, ensuring they are level and properly aligned. Add cabinet doors and hardware to complete the look.
Including Drawers
Drawers offer convenient storage for utensils, cookware, and other small items. Install drawer slides and fit the drawers into place, making adjustments for smooth operation. Consider soft-close drawer slides for a high-end feel. Customize the drawer interiors with dividers or organizers to maximize storage efficiency.

Integrating Appliances
If your design includes appliances like a dishwasher, microwave, or wine cooler, plan their placement carefully. Ensure there is adequate ventilation and access to electrical or plumbing connections. Install appliances according to the manufacturer’s instructions, securing them to the island frame. Integrate appliance panels or trim for a seamless look.
Adding Electrical Outlets
Adding electrical outlets to your kitchen island increases its functionality, allowing you to plug in small appliances or charge devices. Plan the placement of outlets based on your needs and local electrical codes. Hire a licensed electrician to install outlets safely, ensuring they are properly grounded and meet code requirements.
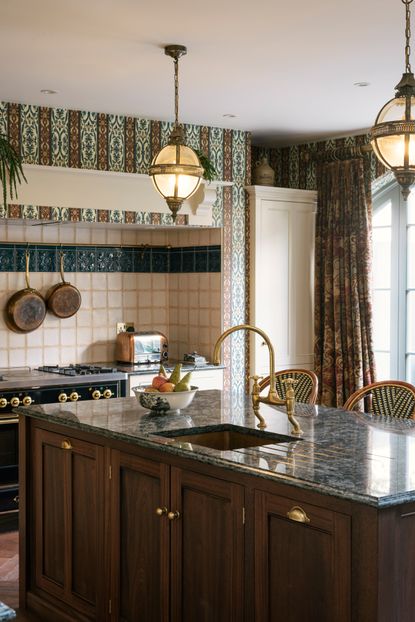
Including a Sink
A sink can enhance the functionality of your kitchen island, especially if it’s used for food prep. Plan the placement and plumbing connections for the sink. Hire a plumber to install the sink and connect it to your home’s water supply and drainage system. Choose a durable, easy-to-clean sink material that complements your countertop.

Finishing and Decorating
Painting or Staining
Applying a finish to your kitchen island enhances its appearance and protects the wood. Choose a paint or stain color that complements your kitchen decor. Sand the surface lightly to create a smooth base, then apply the finish with a brush or roller. Allow the finish to dry completely between coats for a professional look.
Adding Decorative Elements
Decorative elements like moldings, trim, and corbels can enhance the look of your kitchen island. Choose elements that match your design style, whether it’s traditional, modern, or rustic. Measure and cut the pieces to size, then secure them with wood glue and finishing nails. Fill any gaps with wood filler and sand smooth before painting or staining.
Installing Hardware
Hardware like cabinet handles, drawer pulls, and hooks adds functionality and style to your kitchen island. Choose hardware that complements your design and is comfortable to use. Mark the placement of each piece, then drill pilot holes and secure the hardware with screws. Consider soft-close hinges and drawer slides for a high-end touch.
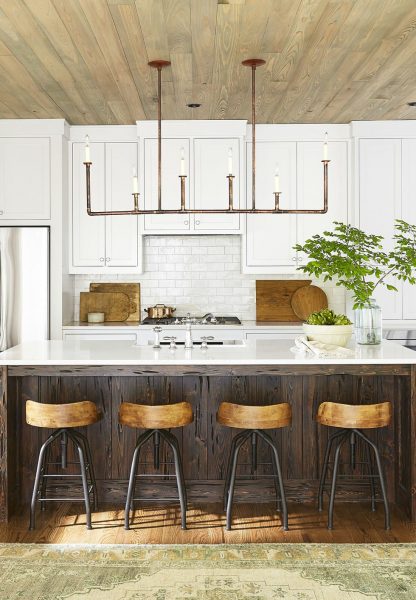
Adding Seating
Select comfortable and stylish seating for your kitchen island. Options include bar stools, counter-height chairs, or benches. Ensure the seating height matches the height of the island’s overhang. Arrange the seating to allow enough space for people to sit comfortably without feeling cramped.
Incorporating Lighting
Proper lighting enhances the functionality and ambiance of your kitchen island. Consider pendant lights, recessed lighting, or under-cabinet lighting to illuminate the workspace. Choose lighting fixtures that complement your design and provide adequate illumination. Hire an electrician to install lighting safely and ensure it meets code requirements.
Final Inspection and Touch-ups
After completing the construction and finishing of your kitchen island, conduct a final inspection. Check for any flaws or imperfections and address them promptly. Clean the island thoroughly to remove dust and debris. Your completed kitchen island should be a beautiful and functional addition to your kitchen, ready for use and enjoyment.
Common Mistakes to Avoid
Inadequate Planning
One of the most common mistakes is failing to plan adequately before starting construction. Without a clear plan, you may encounter issues like insufficient space, poor functionality, or budget overruns. Take the time to assess your needs, measure your space, and create a detailed design before beginning your project.
Ignoring the Kitchen Triangle
Disrupting the kitchen triangle can hinder the efficiency of your kitchen layout. Ensure your island placement does not obstruct the flow between the sink, stove, and refrigerator. Proper planning and consideration of this concept will help maintain a functional and efficient kitchen.
Skimping on Materials
Using low-quality materials to save money can lead to a less durable and less attractive kitchen island. Invest in high-quality materials that will withstand daily use and enhance the overall look of your kitchen. Consider the long-term benefits of quality materials, including durability and ease of maintenance.
Inadequate Support
Failing to provide adequate support for the countertop and overhang can result in sagging or instability. Ensure your frame and support beams are strong enough to bear the weight of the countertop material. Adding additional supports and braces can prevent issues and ensure a sturdy island.
Overlooking Electrical and Plumbing Needs
Neglecting to plan for electrical outlets and plumbing connections can limit the functionality of your island. Consider your electrical and plumbing needs during the planning stage and hire professionals to ensure safe and code-compliant installations. This will enhance the usability of your kitchen island.
Poor Finishing Techniques
Rushing through the finishing process can result in a less polished appearance. Take the time to sand, paint, or stain your island carefully, applying multiple coats as needed. Attention to detail during the finishing stage will result in a professional and attractive kitchen island.

What is the ideal height for a kitchen island with seating?
The ideal height for a kitchen island with seating depends on the type of seating you choose. For bar stools, a height of 42 inches is typical, while counter-height chairs are best suited for islands around 36 inches high. Ensure the seating height provides comfortable legroom and matches the height of your island’s overhang.
How much space should I leave around a kitchen island?
Adequate space around a kitchen island is crucial for functionality and ease of movement. Leave at least 36 to 48 inches of space on all sides to allow for comfortable movement and access to appliances and cabinets. This spacing also ensures that multiple people can use the kitchen simultaneously without feeling cramped.
Can I add a sink to my kitchen island?
Yes, adding a sink to your kitchen island can enhance its functionality, especially for food prep and cleanup. Plan the placement and plumbing connections carefully, and hire a professional plumber to ensure proper installation. Choose a durable and easy-to-clean sink material that complements your countertop.
What type of countertop material is best for a kitchen island?
The best countertop material for your kitchen island depends on your needs and preferences. Popular options include granite, quartz, butcher block, and laminate. Granite and quartz are durable and heat-resistant but can be more expensive. Butcher block offers a warm, rustic look but requires regular maintenance. Laminate is budget-friendly and comes in various styles but may not be as durable as other materials.
How can I incorporate storage into my kitchen island?
Incorporating storage into your kitchen island can maximize its functionality. Options include open shelving, cabinets, and drawers. Customize the storage to fit your needs, such as deep drawers for pots and pans or shelves for cookbooks. Adding organizers and dividers can help keep items neatly arranged and easily accessible.
Do I need a permit to build a kitchen island?
The need for a permit to build a kitchen island depends on local building codes and the scope of your project. Simple islands without plumbing or electrical work may not require a permit, while those involving these elements typically do. Check with your local building authority to understand the necessary permits and approvals for your project. Complying with regulations ensures safety and avoids legal issues.

Related Posts:
- How To Stage A Kitchen Island
- Kitchen Nightmares Long Island
- CuRVed Kitchen Island Pictures
- Home Styles Kitchen Island Cart With Stainless Steel Top
- Stainless Steel Kitchen Islands With Breakfast Bar
- Modern Kitchen Island On Wheels
- Best Pendant Lights Over Kitchen Island
- White Kitchen Cabinets With Different Color Island
- Kitchen Island Cart Wine Rack
- DIY Kitchen Island With Storage