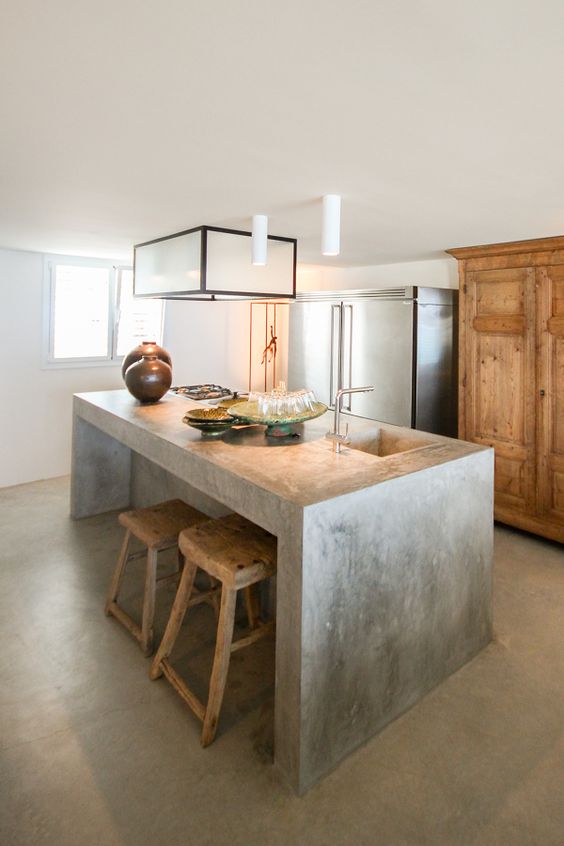
Creating a DIY concrete kitchen island is an ambitious and rewarding project that can elevate the aesthetic and functionality of your kitchen. Concrete is a versatile and durable material that has gained popularity in modern kitchens due to its industrial look and ability to be customized in terms of shape, size, and finish. A concrete kitchen island not only serves as a centerpiece but also provides a robust and practical surface for food preparation, dining, and storage. With some planning, effort, and the right tools, building your concrete kitchen island can be an achievable and satisfying endeavor.
One of the biggest advantages of a DIY concrete kitchen island is its customizability. Unlike pre-made countertops or islands, concrete can be molded into virtually any shape or size. This flexibility allows you to design an island that fits your kitchen’s layout perfectly, whether you’re working with a compact space or a sprawling open-plan area. You can also choose the exact thickness, edge style, and color to match your overall kitchen theme.

When planning your DIY concrete kitchen island, the first step is to determine the size and layout. Consider the primary purpose of the island: will it primarily be used for meal prep, casual dining, or additional storage? This decision will influence its dimensions and design features. Sketch a rough layout and decide where the sink, cooktop, or seating will be located if you’re including these features. It’s important to leave adequate space around the island to ensure proper flow in your kitchen.
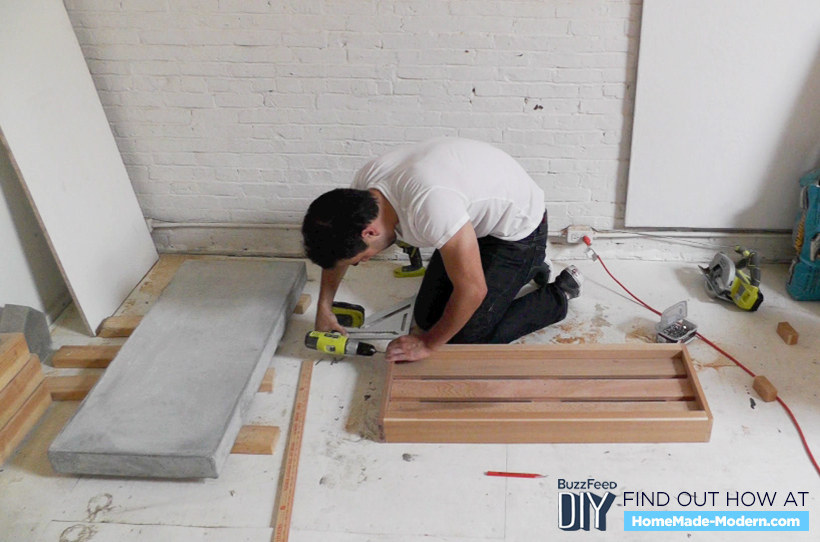
Once the layout is decided, constructing a sturdy base is critical. The base will support the weight of the concrete slab, which can be quite heavy depending on its size and thickness. Many people choose a wooden frame or cabinetry as the base, ensuring that it is securely anchored to the floor for stability. Be sure to use high-quality materials for the base to avoid any issues with sagging or instability over time.

After the base is constructed, the next step is to create a mold for the concrete countertop. Most molds are made using melamine-coated particleboard because it provides a smooth surface that prevents the concrete from sticking. Ensure the mold is well-constructed and watertight to prevent leaks when pouring the concrete. Adding reinforcements like rebar or wire mesh to the mold is also essential for providing additional strength to the countertop.
Mixing and pouring the concrete is perhaps the most crucial part of the project. Use a high-quality concrete mix designed for countertops to achieve the best results. You can mix it manually in a wheelbarrow or use a concrete mixer for larger batches. Once mixed, pour the concrete into the mold in layers, using a trowel to spread it evenly and eliminate air bubbles. Vibrating the mold gently helps settle the mix and reduces voids that can weaken the finished product.

xxx

When it comes to finishing, there are endless possibilities to make your concrete island unique. You can choose a smooth, polished surface for a sleek modern look or opt for a more textured finish to add character. Polishing requires additional tools like diamond-grit pads, but the effort is worth it for a high-end appearance. Adding pigments, stains, or embedded objects like glass or shells can further personalize your countertop.
Curing the concrete is an essential step that requires patience. Allow the concrete to cure for at least 48 hours before removing the mold, and let it continue to cure for another 28 days to reach full strength. During this time, keep the surface moist to prevent cracking. This step ensures the durability and longevity of your concrete kitchen island.
After curing, sealing the concrete is critical. Concrete is porous, so without a sealant, it can absorb stains, grease, or moisture. Choose a food-safe sealant to protect the surface while maintaining a natural look. Sealing not only preserves the concrete’s appearance but also makes it easier to clean and maintain over time.

Installing the concrete slab onto the base requires careful handling due to its weight. Enlist the help of others to lift and position the countertop safely. Use adhesive or silicone caulk to secure it to the base, ensuring it’s level and properly aligned. Any gaps between the slab and the base can be filled with matching caulk for a seamless finish.
One consideration when building a DIY concrete kitchen island is the incorporation of additional features like a sink or cooktop. These elements add functionality but require precise planning and execution. Create cutouts in the mold for these fixtures and reinforce the surrounding areas to ensure the countertop remains strong and stable.
A DIY concrete kitchen island is not without challenges, but the result is worth the effort. The process requires a combination of carpentry, masonry, and finishing skills, so it’s essential to approach the project with preparation and patience. Watching tutorials, consulting guides, or even taking a short workshop on concrete work can help you feel more confident.

Budgeting is another factor to consider. While concrete itself is relatively inexpensive, costs can add up when you include tools, sealants, reinforcements, and finishing materials. However, compared to hiring a professional, building your concrete island can save a significant amount of money while giving you the satisfaction of a DIY accomplishment.
Over time, a concrete kitchen island develops a unique patina that adds character to your kitchen. Regular maintenance, such as resealing every few years, helps preserve its durability and appearance. Cleaning with mild soap and water or a non-abrasive cleaner keeps the surface looking fresh without damaging the sealant.
The beauty of a DIY concrete kitchen island lies in its imperfections. Each project is unique, and the small quirks or variations in texture add personality to the piece. Unlike factory-made options, a DIY island tells a story of creativity, effort, and craftsmanship that you can take pride in every time you use it.
Concrete kitchen islands work well in a variety of design styles, from modern industrial to rustic farmhouses. Their versatility makes them a great choice for homeowners looking for a statement piece that combines form and function. With thoughtful design and careful execution, a DIY concrete kitchen island can transform your kitchen into a stunning and practical space.

Common Mistakes to Avoid
Using the Wrong Concrete Mix: Not all concrete mixes are created equal. Using a mix not specifically designed for countertops can result in a weaker surface prone to cracks or imperfections. Always choose a high-quality countertop mix for best results.
Skipping Reinforcements: Neglecting to add rebar or wire mesh to the mold can weaken the countertop, making it more susceptible to cracking. Reinforcements are essential, especially for larger or thinner slabs.
Rushing the Curing Process: Removing the mold or using the countertop before the concrete has fully cured can compromise its strength and durability. Be patient and allow sufficient time for curing.
Neglecting the Sealing Step: Unsealed concrete absorbs stains and moisture easily, leading to long-term damage. Always seal the surface with a food-safe sealant to protect it and enhance its longevity.
Ignoring Weight Distribution: Concrete countertops are heavy, so failing to build a strong, stable base can result in structural issues. Ensure your base is properly reinforced and securely anchored.
Overlooking Design Details: Poorly planned cutouts for sinks, cooktops, or fixtures can ruin the finished product. Take precise measurements and double-check your mold design before pouring the concrete.

How difficult is it to build a DIY concrete kitchen island?
Building a concrete kitchen island requires moderate DIY skills, including carpentry and masonry. While it’s challenging, proper planning, research, and patience make it achievable for most homeowners.
What tools do I need for this project?
Essential tools include a concrete mixer, trowels, a melamine mold, rebar or wire mesh, diamond-grit pads for polishing, and a sealant. Additional tools like clamps and vibrating tools can help ensure a smooth finish.
Can I add color or texture to my concrete island?
Yes, concrete can be customized with pigments, stains, and textured finishes. You can also embed decorative elements like glass or metal to create a unique look.

How long does the project take to complete?
The entire process, including curing time, can take several weeks. While the actual construction may take a few days, curing the concrete to full strength requires about 28 days.
Is concrete a durable material for a kitchen island?
Concrete is extremely durable when properly sealed and maintained. It resists heat and scratches, making it an excellent choice for a functional and long-lasting kitchen surface.
What are the maintenance requirements for a concrete kitchen island?
Concrete islands require resealing every 1–3 years to maintain their protective barrier. Cleaning with mild soap and water is sufficient for daily upkeep, and avoiding abrasive cleaners helps preserve the finish.

Related Posts:
- Kitchen Farm Table Island
- Black Kitchen Island With White Marble Top
- Kitchen Island Dimensions With Sink And Dishwasher
- Kitchen Island With Large Drawers
- Bull Outdoor Kitchen Island
- John Boos Butcher Block Kitchen Island
- Folding Island Kitchen Trolley
- Contrasting Kitchen Island Countertop
- Williams And Sonoma Kitchen Island
- Slide In Range In Kitchen Island