Fixing a leaky kitchen faucet can seem like a daunting task, but with a little patience and the right tools, it’s something most homeowners can handle themselves. When I first noticed my kitchen faucet leaking, I was worried about the potential water waste and higher utility bills. Little did I know, the issue was not only an annoyance but also a preventable problem. A leaky faucet typically results from worn-out parts, like the O-ring, washer, or valve seat, which can degrade over time due to constant use. The first step to addressing the problem is identifying the type of faucet you have—whether it’s a compression, ball, cartridge, or ceramic disc faucet.
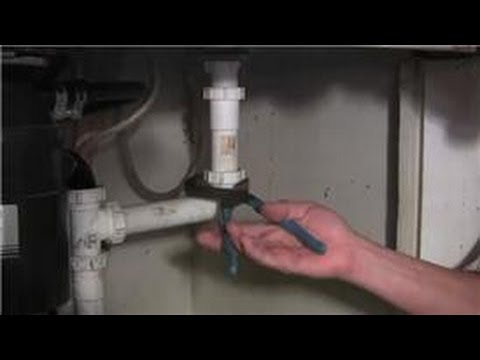
Once you’ve identified your faucet type, the repair process becomes more straightforward. In my case, I had a cartridge faucet, which is one of the more common types found in modern kitchens. I started by turning off the water supply under the sink to avoid any flooding or further leaks. This step is crucial, as it allows you to work on the faucet without water spraying everywhere. I also made sure to plug the sink drain to prevent any small parts from falling down the drain, which could complicate the repair process.

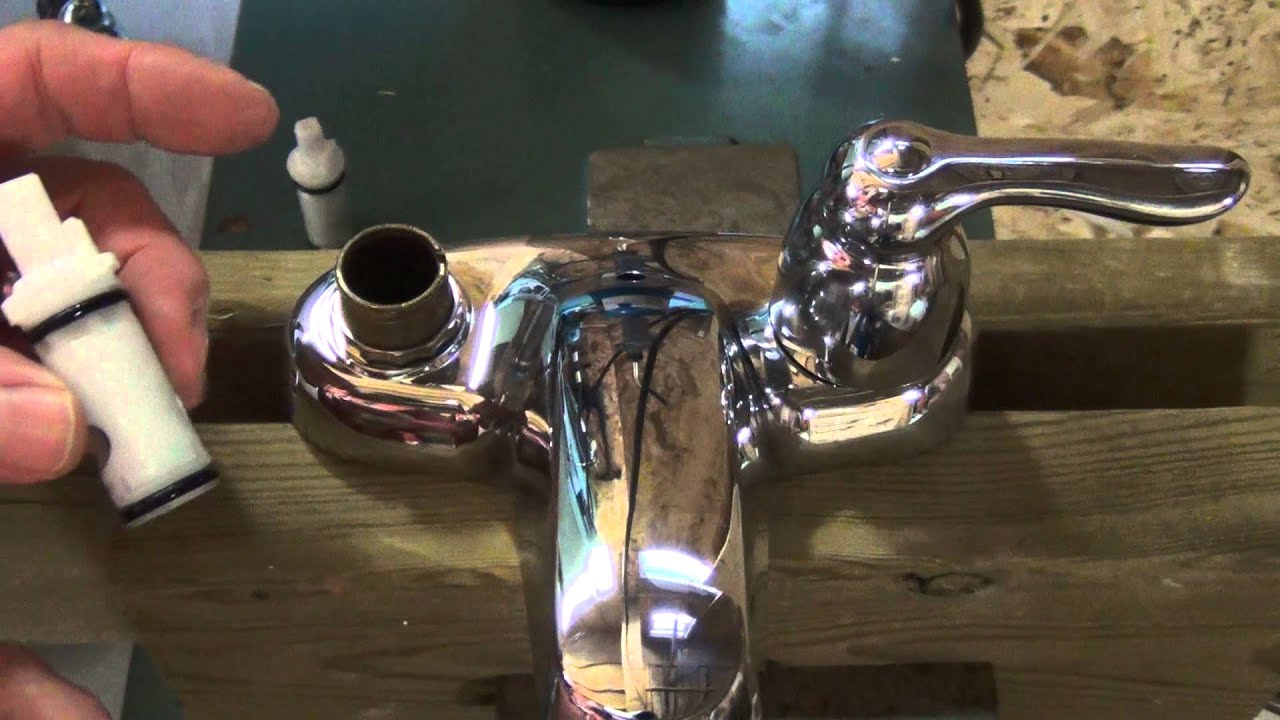
Next, I took apart the faucet handle to access the internal components. Removing the handle typically involves unscrewing a small set screw, which can be hidden under a decorative cap. Once the handle was off, I could see the cartridge inside the faucet body. Cartridges often wear out over time, leading to leaks around the spout or base of the faucet. In my case, the cartridge was visibly damaged, with cracks and mineral buildup that had likely caused the leak.
Replacing the cartridge was easier than I expected. I simply took the old cartridge to the hardware store to find an exact match. It’s essential to purchase the correct replacement part, as there are many variations of cartridges depending on the faucet brand and model. After installing the new cartridge, I reassembled the faucet, making sure each part was securely fastened. Once everything was back in place, I turned the water supply back on and tested the faucet. To my relief, the leak was gone, and the faucet was working like new.
Sometimes, a leaky faucet is caused by a damaged O-ring or washer rather than the cartridge itself. The O-ring is a small rubber ring that helps seal the faucet and prevent leaks around the spout. Over time, the O-ring can become worn or cracked, which compromises its ability to maintain a tight seal. In some cases, you may need to replace the O-ring to stop the leak. I found that removing and replacing the O-ring was a simple process that only required a small screwdriver and some plumber’s grease to ensure a snug fit.
In other instances, the valve seat may be the culprit behind a leaky kitchen faucet. The valve seat is the part of the faucet that connects the spout to the faucet body, and it can wear out due to mineral deposits or general wear and tear. If the valve seat is damaged, it may cause water to leak from the base of the faucet. In my experience, replacing the valve seat can be a bit more involved than replacing the cartridge or O-ring, as it requires specialized tools like a valve seat wrench. However, once the new valve seat was in place, it resolved the persistent leak around the base of the faucet.

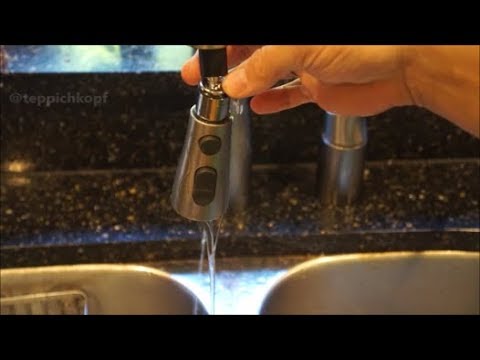
Sometimes, the issue isn’t with any of the internal parts but with the faucet’s aerator. The aerator is a small mesh screen located at the end of the faucet spout that helps control water flow and reduce splashing. If the aerator becomes clogged with mineral deposits, it can create pressure imbalances that cause the faucet to leak. I unscrewed the aerator from my faucet and soaked it in vinegar to dissolve any buildup. After a thorough cleaning, the aerator worked as it should, and the leak stopped.
Throughout the process of fixing my leaky faucet, I discovered the importance of routine maintenance. Regularly cleaning the aerator, checking for worn-out O-rings, and addressing mineral buildup can help prevent leaks before they start. I also learned that using plumber’s grease on the various components during reassembly can improve the longevity of the repair. By taking the time to perform these simple tasks, you can extend the life of your kitchen faucet and avoid the frustration of recurring leaks.
If you’ve gone through these steps and your faucet is still leaking, there may be a deeper issue at play, such as a cracked faucet body or loose connections in the plumbing underneath the sink. In such cases, it’s best to consult a professional plumber to assess the situation and determine if more extensive repairs are needed. While fixing a minor leak is manageable for most DIY enthusiasts, complex plumbing problems require the expertise of a trained professional to prevent further damage.

Additionally, I found it helpful to familiarize myself with the different faucet types before diving into the repair process. Compression faucets, for instance, have two handles for hot and cold water and rely on rubber washers to control water flow. If the washers wear out, they can cause leaks, particularly around the handles. Ball faucets, on the other hand, use a single handle that moves over a ball-shaped cap to control temperature and water flow. Leaks in ball faucets are often due to worn-out seals or springs, which can be replaced with a faucet repair kit.
Ceramic disc faucets are among the most durable options available, with a design that uses ceramic discs to control water flow. Leaks in ceramic disc faucets are rare but can occur if the discs become damaged or if there’s debris inside the faucet. Repairing these faucets usually involves replacing the entire disc assembly, which can be more expensive than repairing other types of faucets, but the long-term reliability makes it worth the investment.
In the end, fixing a leaky kitchen faucet is a task that can save you money, prevent water waste, and improve the functionality of your kitchen. By following the proper steps, using the right tools, and understanding the inner workings of your faucet, you can tackle this common household issue with confidence. The satisfaction of repairing something yourself, combined with the knowledge that you’ve prevented potential water damage, makes the effort well worth it.

Common Mistakes to Avoid
One of the most common mistakes when fixing a leaky kitchen faucet is failing to turn off the water supply before starting the repair. This can lead to water spraying everywhere, creating a mess and potentially causing water damage. Always ensure the water is off to avoid unnecessary complications.
Another mistake is using the wrong replacement parts. Not all cartridges, O-rings, or valve seats are universal, and using the wrong size or type can make the leak worse. Always bring the old part with you to the hardware store to ensure you get an exact match.
Overtightening components during reassembly is another frequent error. While it’s important to ensure a secure fit, overtightening can strip threads, damage seals, or crack parts of the faucet, leading to more leaks. Tighten components just enough to create a proper seal without applying excessive force.
Some homeowners also neglect to clean out the aerator or check for mineral buildup during the repair. This can lead to ongoing leaks even after replacing parts. Cleaning the aerator and inspecting all components for buildup is an essential step.
Last, ignoring the underlying plumbing connections can be a mistake. If the leak persists, it could be due to loose or damaged connections beneath the sink, requiring further investigation and possibly professional help.

Why is my kitchen faucet leaking from the base?
A leak from the base of the faucet is often caused by a worn-out O-ring or a damaged valve seat. The O-ring helps to seal the faucet and prevent water from leaking around the spout. Over time, the O-ring can become brittle or cracked, causing leaks. Replacing the O-ring is a straightforward repair that typically resolves leaks from the base. If the valve seat is the issue, it may need to be cleaned or replaced to stop the leak.
What tools do I need to fix a leaky faucet?
The tools needed to fix a leaky faucet will vary depending on the type of faucet and the part that needs to be replaced. Common tools include a screwdriver, an adjustable wrench, a plumber’s grease, and replacement parts like cartridges, O-rings, or washers. For more complex repairs, such as replacing a valve seat, you may need a specialized valve seat wrench. Having the right tools on hand makes the repair process much easier and more efficient.
How can I prevent my kitchen faucet from leaking in the future?
Preventing future leaks involves regular maintenance of your faucet. Cleaning the aerator to remove mineral buildup, periodically checking for worn-out washers or O-rings, and ensuring the faucet is properly sealed can all help prevent leaks. Applying a plumber’s grease to moving parts during reassembly can also extend the life of the faucet and reduce the likelihood of leaks over time.

How do I know if I need to replace the entire faucet?
If you’ve replaced worn-out parts like cartridges, O-rings, or washers and the faucet is still leaking, it may be time to replace the entire faucet. Other signs that a full replacement is necessary include visible cracks in the faucet body, persistent leaks despite repairs, or excessive corrosion. In some cases, older faucets may no longer have replacement parts available, making replacement the best option.
Can I fix a leaky faucet myself, or should I hire a plumber?
Fixing a leaky faucet is a common DIY task that many homeowners can handle themselves, especially for simple issues like replacing an O-ring or washer. However, if you’re dealing with a more complex faucet type, or if the leak persists after multiple repairs, it may be time to consult a plumber. Professional help is also recommended if you’re unsure about the underlying plumbing or if there are additional issues like low water pressure.
How much water can a leaky faucet waste?
A leaky faucet can waste a surprising amount of water over time. Even a small, slow drip can waste gallons of water each day, leading to higher water bills and unnecessary water waste. Fixing the leak promptly can help conserve water and reduce your utility costs, making it a worthwhile investment of time and effort. In some cases, a dripping faucet can waste hundreds of gallons of water in a month, making it important to address the issue as soon as possible.

Kohler Faucet Leaking At Base
Help With Leaking Kohler Bathroom Faucets

New Moen Single Handle Bathroom Faucet – Bathroom Interior Design
Kitchen Faucet Identification Dandk Organizer

Related Posts:
- Vigo Edison Stainless Steel Pull Down Spray Kitchen Faucet
- How To Repair Kitchen Faucet Spout
- Delta Leland Chrome 1 Handle Pull Down Kitchen Faucet
- Delta High Rise Kitchen Faucet
- How To Replace A Moen Kitchen Faucet Handle
- 12 Spout Reach Kitchen Faucet
- K7 Medium Semi Pro Single Handle Standard Kitchen Faucet
- How To Replace A Delta Kitchen Faucet Sprayer Hose
- Hansgrohe Axor Montreux Kitchen Faucet
- Rugby Kitchen Faucets