Keeping the kitchen faucet sprayer clean is essential for maintaining its functionality and hygiene. Over time, mineral deposits, grease, and grime can accumulate, affecting its spray efficiency and water flow. Cleaning your kitchen faucet sprayer might seem like a small task, but doing it properly can significantly extend its lifespan and ensure it works as it should. It’s one of those household chores that doesn’t take too long if done regularly, and it leaves you with a kitchen fixture that looks and works like new.
The first step in cleaning a kitchen faucet sprayer is gathering the necessary tools. Typically, you’ll need a soft cloth, a small brush (like an old toothbrush), white vinegar, baking soda, and possibly a wrench, depending on your faucet design. These household items are usually sufficient for tackling most cleaning issues without damaging the sprayer. If your faucet is heavily soiled or has stubborn mineral buildup, you might also need a commercial descaling solution.

Before starting, it’s important to turn off the water supply to avoid unexpected messes. You can usually do this by closing the valves under the sink. This precaution not only keeps water from spraying everywhere but also allows you to dismantle the faucet sprayer safely. If your sprayer is attached to a hose, you might need to detach it. Refer to your faucet’s manual if you’re unsure about the disassembly process, as different brands and models have varying mechanisms.
Once the sprayer is detached, inspect it for visible dirt or buildup. Most issues stem from mineral deposits clogging the holes in the spray nozzle. Soaking the nozzle in white vinegar for about 30 minutes is a great way to dissolve these deposits. The acidity of vinegar breaks down calcium and lime, making it easier to scrub away. If vinegar alone doesn’t do the trick, a mixture of vinegar and baking soda can provide extra cleaning power.

After soaking, use a small brush or toothpick to clear out any remaining debris in the spray holes. Be gentle to avoid scratching the nozzle. For stubborn buildup, a second soak might be necessary. Meanwhile, you can clean the hose and other parts of the sprayer. Wipe these down with a damp cloth or vinegar solution to remove grease and dirt. A flexible bottle brush can help clean inside the hose if it’s detachable.
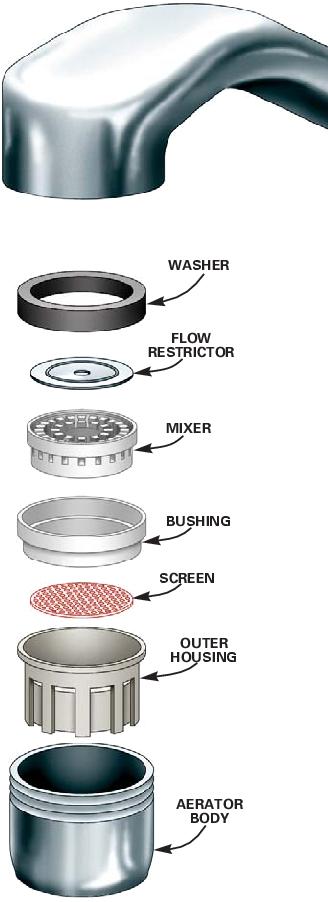
If the sprayer includes a filter or aerator, it’s essential to clean that part too. These components are prone to clogging, which can restrict water flow. Remove the filter or aerator, rinse it under running water, and scrub it gently with the toothbrush. For heavy mineral buildup, soaking it in vinegar is just as effective. After cleaning, ensure you rinse all components thoroughly to avoid leaving any residue.

Before reassembling the sprayer, inspect the hose and connections for signs of wear or leaks. Cracks or damaged seals can cause water to spray unevenly or leak around the base. Replacing worn-out parts during the cleaning process can save you time and effort down the line. Once you’ve ensured everything is in good condition, reattach the sprayer to the hose or faucet and test its functionality.
Run the water through the cleaned sprayer for a few minutes to flush out any remaining vinegar or debris. This step also allows you to check for leaks and confirm that the spray pattern is restored. If everything looks good, you can reassemble the faucet completely. Regularly following this cleaning routine will keep your sprayer in top shape and prevent mineral buildup from becoming a recurring issue.
Maintaining the cleanliness of the sprayer isn’t just about functionality—it’s also about hygiene. Kitchen faucets come into contact with raw food, grease, and other contaminants daily. Over time, bacteria and mold can develop in and around the nozzle, especially if it’s constantly damp. By cleaning your sprayer, you’re not just improving water flow but also ensuring the water you use for cooking and cleaning is sanitary.

For ongoing maintenance, consider wiping down the sprayer with a damp cloth every few days. This simple step can prevent grease and dirt from accumulating, making deep cleaning less necessary. If you live in an area with hard water, a monthly soak in vinegar might be enough to keep mineral deposits at bay. Using a water softener can also reduce the frequency of cleaning by minimizing scale buildup.
Another tip is to avoid using abrasive cleaners or scrubbers on your faucet sprayer. These can scratch the surface, making it more prone to collecting dirt and losing its shine. Instead, stick to gentle cleaning agents like vinegar or mild dish soap. If you prefer a commercial cleaner, ensure it’s compatible with your faucet’s material to avoid damage.
Don’t forget to clean around the base of the faucet where the sprayer attaches. This area can accumulate grime over time, especially if water pools there. A simple wipe-down with a vinegar-soaked cloth can keep this spot clean. It also prevents mold and mildew from forming, which can lead to unpleasant odors and unsightly stains.

Keeping your kitchen faucet sprayer clean isn’t just about aesthetics—it’s also about maintaining your water quality. A clogged or dirty sprayer can harbor bacteria and reduce water pressure, affecting your daily kitchen tasks. Regular cleaning ensures that you’re getting the most out of your faucet and keeping your kitchen a healthy environment.
Taking a few extra steps to clean the sprayer when you clean your sink can help make it a habit. For instance, wiping it down with a dish sponge or spritzing it with a vinegar solution as part of your daily cleaning routine can reduce the need for deep cleaning sessions. It’s a small effort that can save you time in the long run.
In the end, keeping your kitchen faucet sprayer clean is all about regular maintenance and using the right tools. By making this a routine task, you’ll ensure that your sprayer functions efficiently and lasts for years. It’s a simple but rewarding way to keep your kitchen in tip-top shape.

Common Mistakes to Avoid
One common mistake when cleaning a kitchen faucet sprayer is using harsh chemicals or abrasive tools. These can damage the surface of the sprayer, leading to scratches or discoloration. Always stick to gentle cleaning agents like vinegar or mild dish soap. Another error is neglecting to turn off the water supply before disassembling the sprayer, which can result in an unexpected mess. Taking a moment to shut off the valves under the sink is a crucial step.
Failing to soak the sprayer components long enough in vinegar can also lead to incomplete cleaning. Mineral deposits, especially from hard water, often require time to dissolve fully. Rushing this step might leave the sprayer partially clogged, negating your efforts. Additionally, forgetting to clean the filter or aerator is a common oversight. These small components play a big role in water flow and should not be ignored during the cleaning process.
Another mistake is reassembling the sprayer without checking for wear and tear. Cracked hoses, damaged seals, or loose connections can lead to leaks or reduced performance. Replacing these parts during cleaning can save you from having to disassemble everything again later. Lastly, skipping a final rinse after using vinegar can leave a strong odor or taste in the water, which is unpleasant for cooking or drinking.

Why is my kitchen faucet sprayer not working properly?
A kitchen faucet sprayer may not work properly due to clogged holes in the nozzle, a blocked filter, or mineral buildup from hard water. Regular cleaning with vinegar and a brush can resolve these issues. Additionally, check for damaged seals, cracks in the hose, or loose connections, as these can also affect performance. Addressing these factors ensures the sprayer operates efficiently.
How often should I clean my kitchen faucet sprayer?
The frequency depends on how often you use the sprayer and whether you live in an area with hard water. For most households, a deep cleaning every one to two months is sufficient. In between, wiping the sprayer down with a damp cloth or vinegar solution weekly can prevent grime and mineral buildup from accumulating.
Can I use commercial cleaners to clean my faucet sprayer?
Yes, you can use commercial cleaners designed for kitchen fixtures, but ensure they are non-abrasive and safe for your faucet’s material. Always read the label and test the cleaner on a small, inconspicuous area first. Natural cleaners like vinegar and baking soda are often just as effective and pose less risk of damaging the sprayer.

What should I do if my sprayer is still clogged after cleaning?
If the sprayer remains clogged after cleaning, try soaking it in a stronger vinegar solution or a commercial descaling product. You can also use a toothpick or small brush to dislodge stubborn debris. If these steps don’t work, there may be a deeper issue with the internal mechanisms, and replacing the sprayer might be necessary.
Can cleaning the sprayer improve water pressure?
Yes, cleaning the sprayer can improve water pressure by removing clogs and buildup that restrict water flow. Mineral deposits, grease, and dirt can block the nozzle and filter, reducing efficiency. Regular cleaning ensures that water flows freely and at the intended pressure, making kitchen tasks easier.
How do I prevent mineral buildup in my faucet sprayer?
Preventing mineral buildup involves regular cleaning and maintenance. Soaking the sprayer in vinegar monthly can dissolve deposits before they become problematic. Using a water softener or installing a faucet filter can also reduce the minerals in your water, minimizing scale accumulation and keeping your sprayer functioning optimally.

Kitchen Sprayer Kit Kitchen Faucet Side Sprayer Head and Hose Assembly

Moen château faucet low pressure

Do I really need to sprayer faucet in my kitchen sink?

Related Posts:
- How To Remove Kitchen Sink Faucet Handle
- Identify My Kitchen Faucet
- How To Clean Kitchen Faucet Sprayer
- Brizo Kitchen Faucet Parts
- Laminar Flow Kitchen Faucet
- Kitchen Faucet Sprayer Hose Clip
- 4 Gpm Kitchen Faucet
- Almond Kitchen Sink Faucets
- Delta Touchless Kitchen Faucet Not Working
- Single Handle Pullout Kitchen Faucet Repair