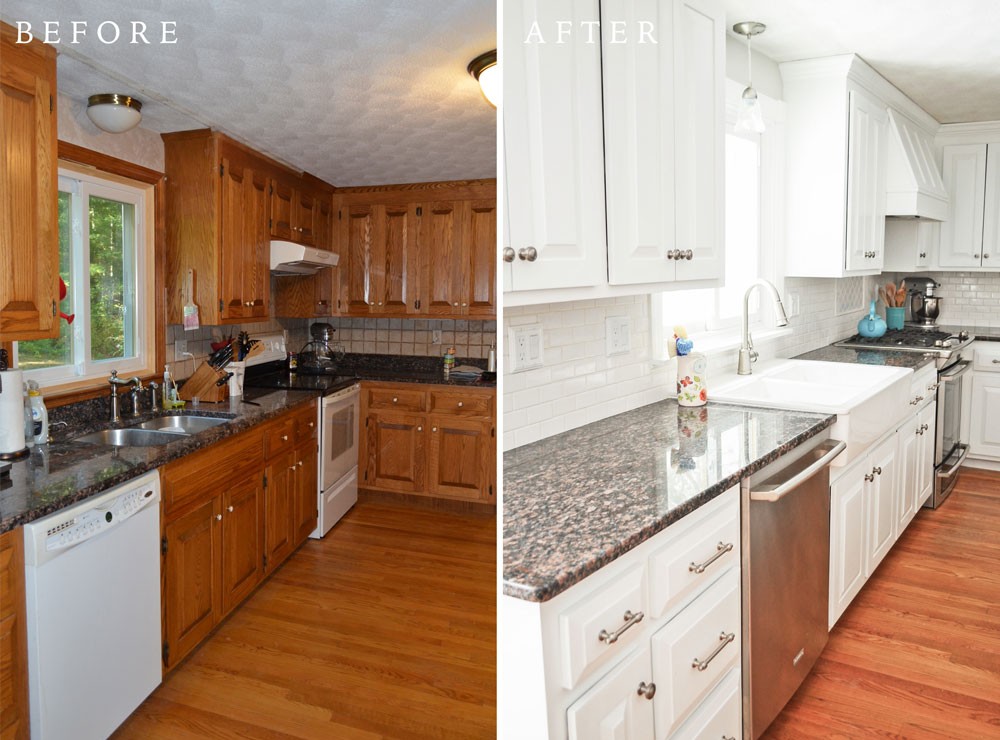
Refinishing kitchen cabinets without sanding is a popular method for homeowners looking to update the look of their cabinets without the hassle and mess of sanding. This process involves thorough cleaning, surface preparation, and the application of a new finish to achieve a fresh and updated appearance for kitchen cabinets.
The first step in refinishing kitchen cabinets without sanding is to thoroughly clean the surfaces to remove dirt, grease, and grime. This can be done using a mild detergent or degreaser and a sponge or cloth. It’s important to ensure that the surfaces are completely clean and free of any residue before proceeding to the next step.
Once the cabinets are clean, the next step is to remove the existing finish or paint using a liquid deglosser or chemical stripper. These products work by breaking down the existing finish, making it easier to remove without the need for sanding. It’s important to follow the manufacturer’s instructions carefully when using these products and to work in a well-ventilated area.
After the existing finish has been removed, the next step is to prepare the surfaces for the new finish. This involves lightly sanding the cabinets with fine-grit sandpaper to smooth out any rough areas and ensure proper adhesion of the new finish. While sanding is not required as part of this method, lightly sanding the surfaces can help to improve the final result.
Once the surfaces have been sanded, it’s important to clean them again to remove any dust or debris. This can be done using a tack cloth or a damp cloth to ensure that the surfaces are clean and ready for the new finish.
After the surfaces have been cleaned, the next step is to apply a bonding primer to the cabinets. This primer helps to create a strong bond between the existing surface and the new finish, ensuring a durable and long-lasting result. It’s important to choose a primer that is compatible with the type of finish you plan to use and to follow the manufacturer’s instructions for application.

Once the primer has dried, the next step is to apply the new finish to the cabinets. This can be done using a brush, roller, or sprayer, depending on the type of finish you choose. It’s important to apply the finish evenly and smoothly, working in small sections to avoid drips and runs.
After the first coat of finish has been applied, it’s important to allow it to dry completely before applying additional coats. Depending on the type of finish you choose, multiple coats may be required to achieve the desired look and level of protection.
Once the final coat of finish has dried, the cabinets can be reinstalled in the kitchen. It’s important to handle the cabinets carefully to avoid damaging the new finish, and to allow them to fully cure before putting them back into use.
Refinishing kitchen cabinets without sanding is a cost-effective and relatively simple way to update the look of your kitchen. By following these steps and using the right products and techniques, homeowners can achieve beautiful and long-lasting results without the need for sanding.

Do You Need To Sand If You’re Repainting Kitchen Cabinets?
Whether or not you need to sand before repainting kitchen cabinets depends on several factors, including the condition of the existing finish, the type of paint you plan to use, and your desired outcome. In many cases, sanding is recommended to ensure proper adhesion and a smooth, professional-looking finish, but there are some instances where it may not be necessary.
If the existing finish on the cabinets is in good condition, with no peeling, chipping, or flaking, and if you plan to use a paint that is specifically formulated for use on previously painted surfaces, you may be able to skip sanding altogether. However, it’s still important to clean the cabinets thoroughly to remove any dirt, grease, or grime that could affect the adhesion of the new paint.
On the other hand, if the existing finish is in poor condition, or if you plan to use a paint that is not specifically formulated for use on previously painted surfaces, sanding is typically recommended. Sanding helps to roughen up the surface of the cabinets, creating a better bond for the new paint and ensuring a smoother, more professional-looking finish.
When sanding kitchen cabinets before repainting, it’s important to use the right tools and techniques to achieve the best results. Start by removing the cabinet doors and hardware, then use a medium-grit sandpaper (such as 120-grit) to sand the surfaces of the cabinets and doors lightly. This helps to roughen up the existing finish and create a surface that the new paint can adhere to.
After sanding, be sure to clean the surfaces thoroughly to remove any dust or debris. You can use a tack cloth or a damp cloth for this purpose, being careful not to saturate the wood with water.
Once the surfaces are clean and dry, you can proceed with priming and painting the cabinets. Use a high-quality primer that is specifically formulated for use on kitchen cabinets, and follow the manufacturer’s instructions for application. After the primer has dried, you can apply the paint using a brush, roller, or sprayer, depending on your preference.

Refinish Kitchen Cabinets Kit / Interior: Appealing Rustoleum Cabinet Transformation

Easy Kitchen Updates That Make a Big Impact HGTV. Make Waves With Your Backsplash. One way

How To Restore Kitchen Cabinets Without Sanding And Varnishing : DIY Gel Stain Cabinets (No

How to Restain Kitchen Cabinets without Sanding – Kitchen Shelf Display Ideas Check m

How to Restore Kitchen Cabinets Without Sanding and Revarnishing eHow

Refinishing Kitchen Cabinet Ideas: Pictures & Tips From HGTV HGTV
How To Paint Cabinets Without Sanding REHAB DORKS #kitchen&bathroomcabinets Old kitchen

Related Posts:
- How To Redo Kitchen Cabinets Cheap
- Galley Kitchen Cabinet Design
- How To Stain Your Kitchen Cabinets
- Kitchen Cabinet Design For Apartment
- Green Color Kitchen Cabinets
- Dark Kitchen Cabinets Decorating Ideas
- Farmhouse Kitchen Cabinet Colors
- Standard Height Of Top Kitchen Cabinets
- Faux Kitchen Cabinets
- Stainless Steel Wall Cabinets Kitchen