Repairing a dripping kitchen faucet can seem like a small issue, but over time, that persistent drip can lead to water waste, higher utility bills, and irritation. A faucet that drips just once per second can waste more than 3,000 gallons of water per year. Addressing a leaking faucet promptly not only saves water but also helps prevent potential damage to your sink or countertop. Most dripping faucets are caused by worn-out washers, gaskets, O-rings, or seals. Fortunately, fixing the problem is usually a straightforward process that requires only basic tools and minimal experience with plumbing.
Before you start the repair, it’s important to identify the type of faucet you have. The four main types of faucets are compression, ball, cartridge, and ceramic disc. Each type has a different internal mechanism, and the method for fixing the drip will vary slightly depending on which type you have. Compression faucets are typically older models that use rubber washers to control the flow of water. These washers can wear out over time and cause the faucet to drip. Ball faucets, commonly found in single-handle designs, use a ball mechanism to control water flow and temperature, and the internal seals can wear out, leading to leaks. Cartridge faucets rely on a movable cartridge that controls water flow, and ceramic disc faucets use a rotating disc that seals tightly to prevent leaks.

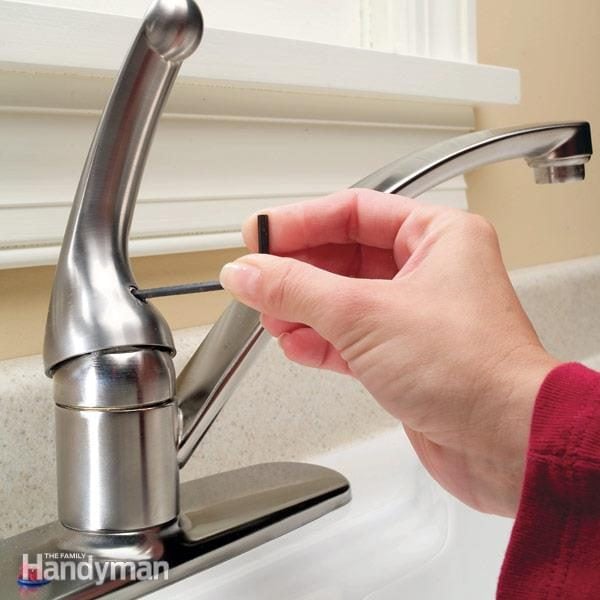
Once you’ve identified your faucet type, you’ll need to gather the necessary tools. Most faucet repairs require a few basic items: a screwdriver, adjustable wrench, plumber’s tape, and possibly replacement parts such as washers, O-rings, or cartridges. You may also need a hex key or Allen wrench to remove certain parts, depending on the faucet design. It’s a good idea to have a towel or small bucket handy to catch any water that might spill during the repair process.
Before starting the repair, be sure to turn off the water supply to the faucet. There should be shutoff valves located under the sink. If you can’t find individual valves for the sink, you may need to turn off the main water supply for your home. Turning off the water supply ensures you don’t have an unexpected flood when you start disassembling the faucet. After turning off the water, open the faucet to drain any remaining water in the lines.

For compression faucets, the most common cause of drips is a worn rubber washer. To access the washer, start by removing the handle. Most faucet handles are secured with a screw, which may be hidden under a decorative cap. Once the handle is removed, you’ll see the valve stem. Use an adjustable wrench to unscrew the stem and expose the washer. The washer is typically located at the base of the valve stem and is held in place with a screw. Remove the old washer and replace it with a new one of the same size. Reassemble the faucet and turn the water back on to check for any remaining leaks.
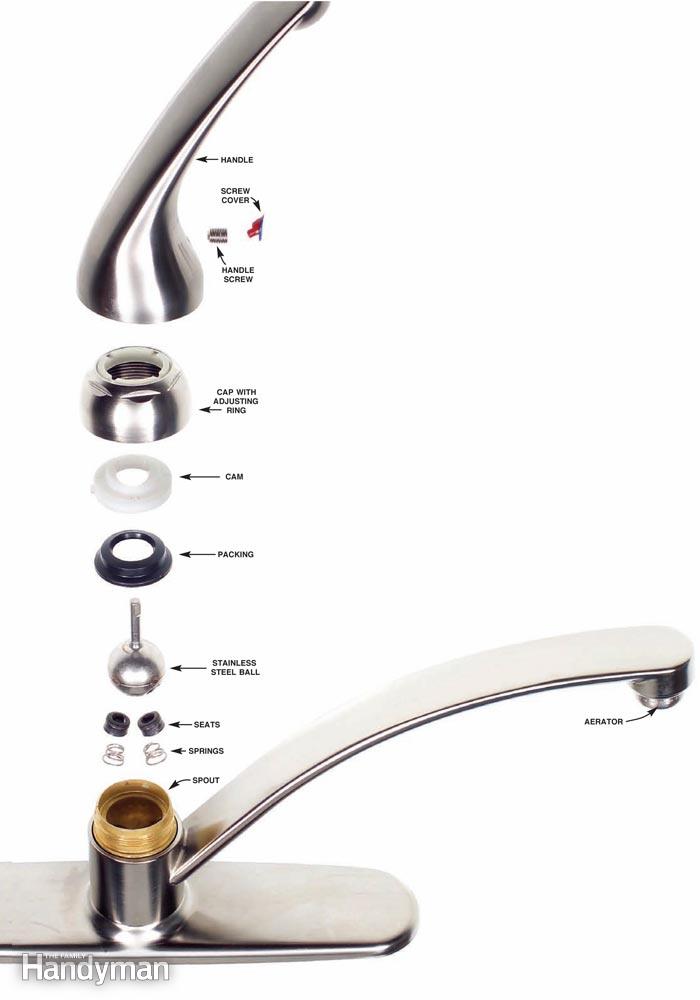
For ball faucets, the repair process involves replacing the seals and springs inside the faucet body. These faucets are a bit more complex than compression faucets, but the basic process is similar. Start by removing the handle to access the ball mechanism. Once the handle is off, you’ll need to unscrew the cap and collar to remove the ball. Inside the faucet body, you’ll find small rubber seats and springs that control the flow of water. Over time, these parts can wear out, leading to drips. Replace the old seats and springs with new ones and reassemble the faucet.

Cartridge faucets are one of the most common types of faucets in modern homes. If your cartridge faucet is dripping, the issue is likely with the cartridge itself. To repair a cartridge faucet, first, remove the handle to expose the cartridge. Depending on the faucet design, you may need to use a wrench or pliers to pull the cartridge out. Once removed, inspect the cartridge for any signs of wear or damage. In many cases, simply replacing the cartridge will solve the dripping issue. Be sure to take the old cartridge with you to the hardware store to find an exact replacement.
Ceramic disc faucets are known for their durability, but even these can develop leaks over time. If your ceramic disc faucet is dripping, the ceramic disc inside the faucet may need to be replaced. Begin by removing the handle and then unscrewing the escutcheon (the decorative cover). This will give you access to the disc cartridge. Carefully remove the cartridge and inspect the ceramic discs for any cracks or damage. If the discs are damaged, you’ll need to replace the entire cartridge, as the discs are not typically sold separately. Once the new cartridge is installed, reassemble the faucet and turn the water back on.
After completing the repair, turn the water supply back on and test the faucet to make sure the dripping has stopped. If the faucet continues to drip after replacing the necessary parts, it’s possible that the problem lies deeper in the plumbing, or that a part was not installed correctly. Double-check your work and make sure all components are seated properly and tightened.
Regular maintenance can help prevent future leaks in your faucet. For instance, hard water can cause mineral deposits to build up inside the faucet, leading to premature wear on seals and washers. Cleaning the faucet regularly and using a water softener if necessary can help extend the life of your faucet components. Additionally, replacing washers, O-rings, and seals as soon as you notice wear can prevent small drips from turning into larger leaks.

While repairing a dripping faucet is a relatively simple task, there are times when it may be more practical to replace the entire faucet, especially if it’s an older model or if the internal components are severely corroded. Newer faucets tend to be more water-efficient and come with better seals and valves, reducing the likelihood of future leaks.
If you’re unsure about the repair or run into unexpected difficulties, don’t hesitate to call a plumber. While a DIY faucet repair is usually straightforward, there are some cases where professional help is needed, especially if there are issues with the plumbing beyond the faucet itself.
One additional tip is to keep track of the brand and model of your faucet, as different brands often require specific parts. Many hardware stores carry universal replacement parts, but it’s always a good idea to match the new parts exactly to your existing faucet. This ensures that the replacement parts fit correctly and work as intended.
Dripping faucets are a common household issue, but with the right tools and a little patience, they’re usually easy to fix. Whether you’re replacing a worn washer, installing a new cartridge, or swapping out rubber seats and springs, tackling the problem early can save water and prevent bigger problems down the road.
:no_upscale()/cdn.vox-cdn.com/uploads/chorus_asset/file/19494721/step_02_0.jpg)
Common Mistakes to Avoid
One common mistake when repairing a dripping faucet is not turning off the water supply before starting the repair. Even though it might seem obvious, it’s easy to forget this step in the rush to fix the leak. Always make sure the water supply is off to avoid a messy situation.
Another frequent mistake is failing to match replacement parts properly. Faucets come in different styles and brands, and the internal components vary. If you don’t bring the old parts with you to the hardware store, it’s easy to accidentally buy the wrong size or type of replacement part. Always compare your old part to the new one before installation to ensure a perfect fit.
Overtightening screws, nuts, or other components is another issue that can lead to problems. While you want everything securely in place, overtightening can strip screws or damage washers and seals, leading to leaks later on. Tighten parts just enough to create a secure seal without overdoing it.
Many people also forget to clean the faucet components before reassembling the faucet. Mineral buildup from hard water can cause parts to wear prematurely or interfere with the fit of replacement parts. Taking the time to clean all components with a vinegar solution before reassembling can help extend the life of your faucet.
Lastly, rushing through the repair process often leads to mistakes. Patience is key when dealing with plumbing repairs. Skipping steps or rushing to finish can result in incomplete repairs, meaning the faucet may continue to drip after you think the problem is fixed.

Why is my kitchen faucet dripping?
A kitchen faucet typically drips due to worn-out components like washers, O-rings, or seals. Over time, these parts degrade and fail to form a tight seal, allowing water to leak through. In some cases, mineral buildup from hard water can damage internal parts or prevent them from seating correctly, leading to leaks.
Can I fix a dripping faucet myself, or should I hire a plumber?
Most dripping faucet repairs are simple enough to handle on your own with basic tools. Replacing washers, O-rings, and cartridges is a relatively easy process, especially with the help of online tutorials or manufacturer instructions. However, if you’re uncomfortable with plumbing or run into issues beyond the faucet, calling a plumber might be a good idea.
How do I know which parts to replace in my faucet?
The parts that typically need replacing in a dripping faucet are the washers, O-rings, or cartridge, depending on the type of faucet. To determine which parts you need, first identify your faucet type (compression, ball, cartridge, or ceramic disc). Once you’ve disassembled the faucet, inspect the internal components for wear or damage, and take the old parts to the hardware store to find exact replacements.

How can I prevent my faucet from dripping again in the future?
Regular maintenance is key to preventing future leaks. Clean the faucet regularly to prevent mineral buildup, and replace worn washers or seals as soon as you notice signs of wear. Using a water softener in areas with hard water can also reduce mineral deposits that lead to drips and leaks. Additionally, avoid overtightening the faucet handles, as this can cause excessive wear on internal components.
How long does it take to fix a dripping faucet?
The time it takes to fix a dripping faucet depends on the type of faucet and the extent of the issue. For a basic repair, such as replacing a washer or O-ring, the process usually takes about 30 minutes to an hour. More complex faucets, like ball or ceramic disc faucets, might take longer due to additional components. Gathering the right tools and parts beforehand can help streamline the repair.
Should I replace my faucet if it’s dripping?
In most cases, a dripping faucet can be repaired by replacing the worn-out parts. However, if the faucet is old or severely corroded, it might be more practical to replace it entirely. Newer faucets are more water-efficient and may have better seals and valves, reducing the chances of future leaks. If repairs become frequent or difficult, it might be time to consider a new faucet altogether.

How to repair a set of leaky 2 handle Moen washerless faucets. Easiest faucet repair! Plumbing

How to Fix a Dripping Faucet

How To Fix A Leak Under Bathroom Sink

Related Posts:
- Pegasus Kitchen Faucet Repair Parts
- Delta Waterfall Single Handle Kitchen Faucet Repair
- Delta Linden Kitchen Faucet Reviews
- Grohe Feel Kitchen Faucet
- High Arc Pullout Kitchen Faucet
- Highest GPM Kitchen Faucet
- Harrington Brass Works Kitchen Faucets
- Jaquar Kitchen Faucets
- How To Replace Kitchen Faucet Handles
- Rv Outdoor Kitchen Faucet